ASU Department Manager
Things to note before signing up for your iLab account:
- Make sure you know your ASURITE ID and password.
- Approved web browsers include Chrome, Firefox, Safari or Edge. Do not use Internet Explorer.
Steps
- Navigate to ASU’s landing page for iLab Solutions and click on the sign-up icon in the upper-right corner.

- A popup window will appear with two boxes. Click the “here” hyperlink in the first box to register using your ASURITE ID and password.

- The ASU web login page will appear. After entering your ASURITE ID and password, you will be prompted to select the PI/Advisor, or Lab/Class name. Instead, look for the name of your department. It may be listed by its acronym, e.g. OKED Admin (ASU) Group.
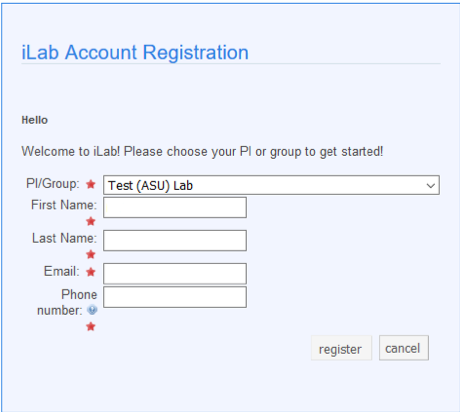
- Upon submitting your registration, you will receive a confirmation page indicating your account activation is pending approval. Another department manager must approve your request and add you as a financial manager to the department. Alternatively, you can contact iLab Support for assistance.
The navigation panel allows you to access the following features:
- Home lists submitted service requests, messages, recently used cores and institutions (in your name only, not for your department).
- Core Facilities lists all core facilities at your own institution, partner institutions, and other outside institutions using iLab as well as a search function.
- My Reservations provides an overview of all current, upcoming and recent reservations in iLab (in your name only, not for your department).
- View Requests displays all service requests ordered through your department.
- Invoices lists all invoices from your department.
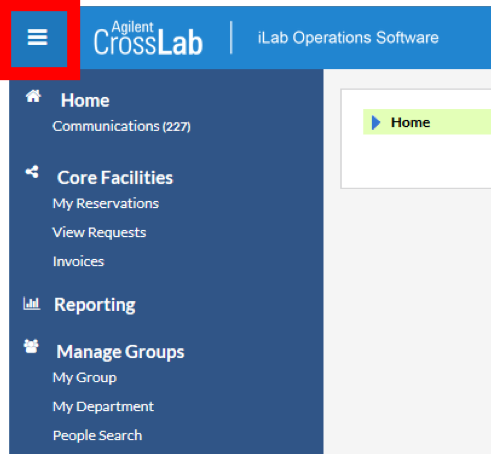
- Reporting allows you to run reports on all data in iLab for which you have access.
- Manage Groups displays all groups and departments in which you are listed as a financial manager or member. Clicking a group name directs you to that group’s membership and management settings. Clicking a department name directs you to that department’s membership and management settings.
- My Group directs to the parent Manage Group page. Hovering reveals a sub-menu of your groups to direct you to that group’s membership and management settings.
- My Departments allows you to manage the research groups and other financial managers affiliated with your department.
- People Search displays the names and contact information of everyone affiliated with your department.
The top of the screen provides access to various system functions:

- Search allows you to search for specific cores and services. Enter a key term or the first few letters and click ‘Go.’ Your results will display on the page.
- Clicking your Username will reveal the following options:
- My Profile, which allows you to view and edit your user profile.
- System upgrades, which grants access to all messages regarding the system and updates/feature/bug fixes of the iLab software.
- The Help link brings you to iLab's customer support portal.
- Sign Out logs you out of the system.
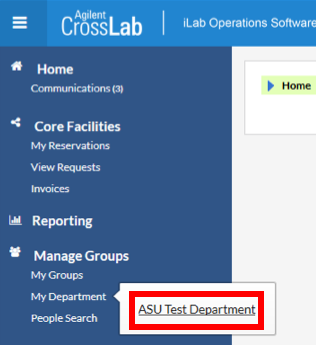
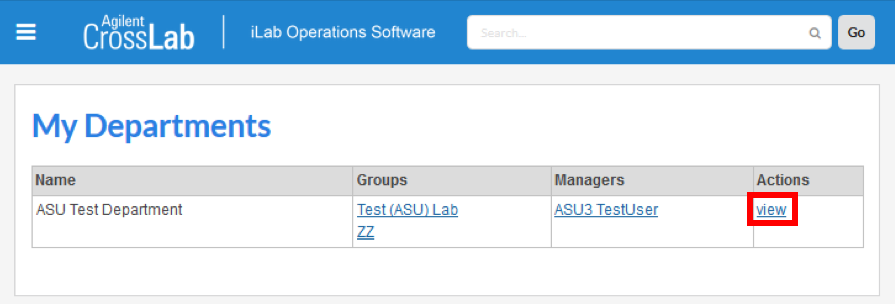
Access the settings page for your department by hovering your mouse over My Department, then clicking the department name when it appears. This can also be accessed from the My Departments page by clicking the ‘view’ link next to the appropriate department. Once listed as a financial manager of a department in iLab, you have access to add or remove research groups. Being a financial manager within a department allows you to view all group invoices, run reports, and manage group member and accounts.
See related topics:
Adding and removing groups
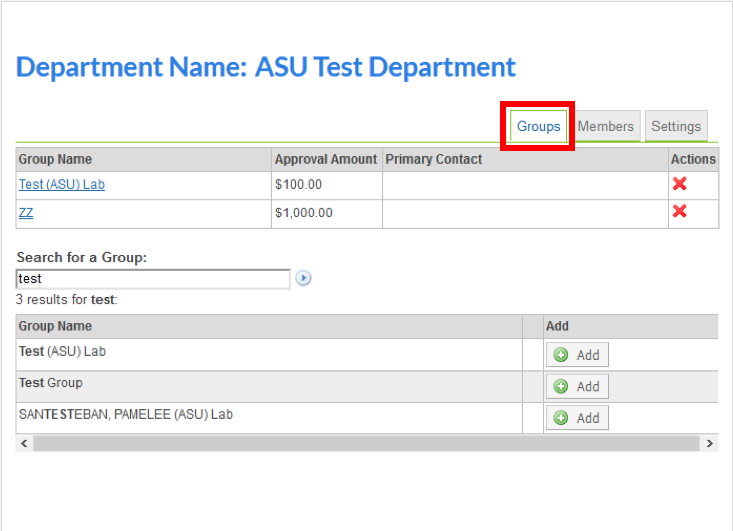
On the ‘Groups’ tab of your department’s settings page, you may add and remove new research groups. To remove a group that is no longer affiliated with your department, click the red X. To add a group, enter the PI’s last name, class name, or lab name into the search field, then click the arrow to search. After results appear, click the Add button to whichever group needed. If unable to find the group you need, it is possible the group has not yet been added to iLab. Contact iLab Support for assistance.
Adding and removing department managers
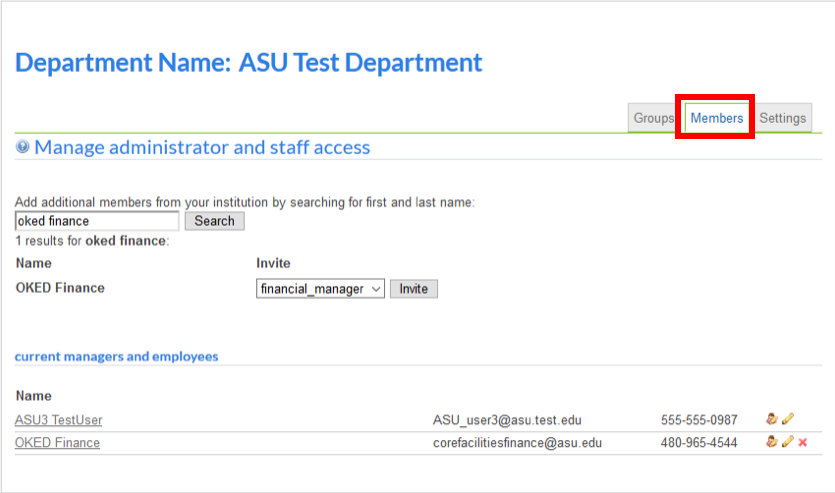
On the Members tab of your department’s settings page you may add and remove new managers. To remove a manager that is no longer affiliated with your department, click the red X icon. To add a manager, enter their last name into the search field then click to search. After results appear, click the Invite icon for the desired person. If unable to find the manager you need, it is possible they have not yet registered in iLab.
Programs and Gifts may be added to a group for spending management as needed. Grants appear automatically in the group designated as the Lead PI role in ASU’s Financial System. All researchers delegated to spend on a grant must request membership into the Lead PI’s group, including the Co-Investigator. A grant’s expiration date is fed directly from ASU’s Financial System; if expired, then researchers will not be able to request new services. Unbilled services rendered during the period of performance may still be charged within 60 days after the grant’s expiration.
Assigning spending permission
To assign spending permission to a researcher within a lab or group, first access the group via the navigation panel. Then, navigate to the Membership Requests & Accounts tab, where the current members of the group will be listed with checkboxes underneath each available account. Assign spending permission by checking the box underneath an account for any given user. The box will highlight green signifying the change is in effect.

Unassigning spending permission
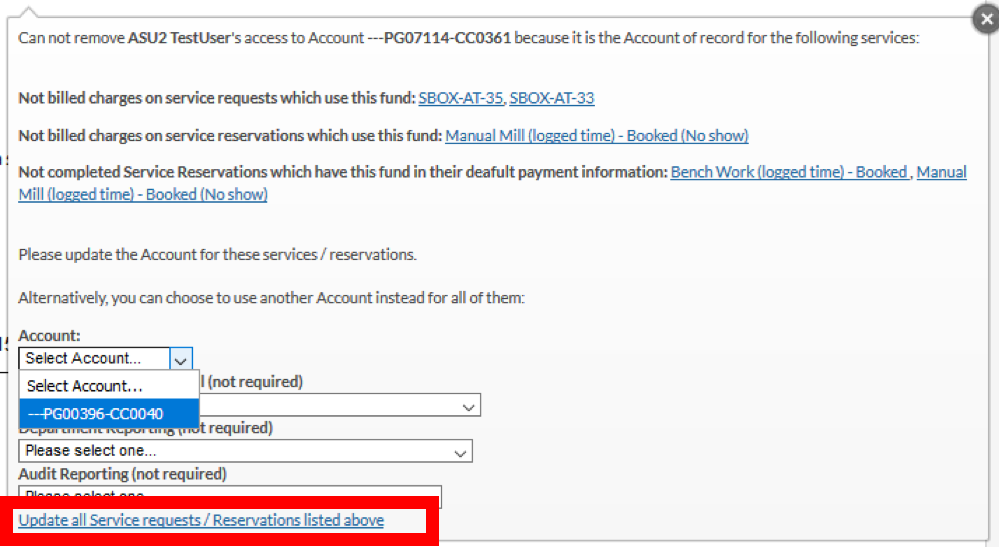
Access the group via the navigation panel. Then, navigate to the Membership Requests & Accounts tab and unassign spending permission by unchecking the box. If there are unbilled charges pending on an account, a popup window will appear summarizing these charges. To unassign spending permission on the account under this circumstance, first make sure the researcher has permission to spend on another account which will pay for the unbilled charges. Select this new account from the dropdown available, then click the link to Update all Service Requests / Reservations Listed Above. The window will refresh with the account unassigned and the charges moved to the new account selected.
Requesting an account
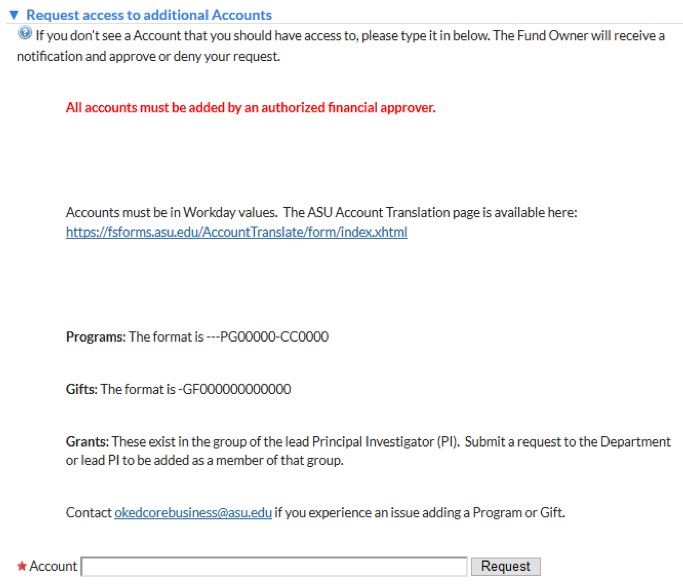
If either a Program or Gift need to be added to a lab or group, click to expand the section labeled Request Access to Additional Accounts, located on the Membership Requests & Accounts tab. Instructions will appear describing the proper format for the account, and a field in which to request it to your group. Pay close attention to the formatting, including the number and placement of dashes (-). If the format is not matched exactly, you will receive an error.
Selecting payment information
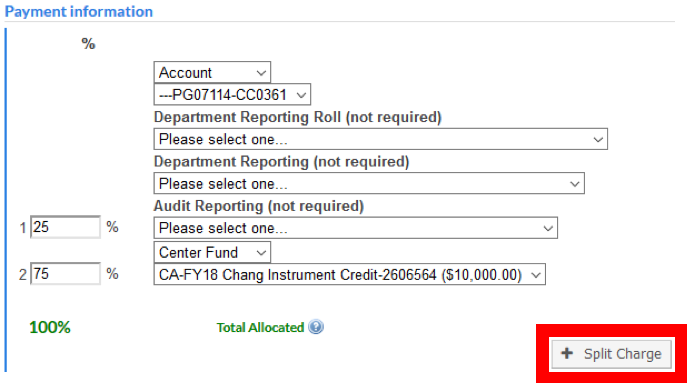
When making a reservation or requesting services, you are required to provide a funding source to charge for services, which must be assigned on the lab or group settings page. Fund types available include Account and Center Fund. Distinguish between the two types from the first dropdown menu.
- Account displays programs, grants and gifts.
- Additional options are available in the three dropdown menus below the account, including Department Reporting Roll, Department Reporting, and Audit Reporting. These tags are optional and are not required to successfully submit a request or make a reservation. Check with your department financial manager in case they request a specific tag to be used.

- Additional options are available in the three dropdown menus below the account, including Department Reporting Roll, Department Reporting, and Audit Reporting. These tags are optional and are not required to successfully submit a request or make a reservation. Check with your department financial manager in case they request a specific tag to be used.
- Center Fund: If your group was awarded a balance toward use of a core facility, then switching the first dropdown menu from Account to Center Fund will allow you to select it from the next menu. Note: You must be assigned permission to spend on a Center Fund in the same way as any other account type.
Clicking on the “Split Charge” icon in the lower-right corner of the Payment Information section allows you to split the cost of a reservation or any charge within a service request on multiple funds. Change the percentage of each split to the desired amount and ensure the total equals 100%.
Related Topics
The links below redirect to the iLab Help Site on these related topics:
- Access your lab or group
- Membership Requests & Fund Numbers tab layout
- Filter account numbers and members
- Customize the account grid
Members of a research group may be managed from the Members tab of a group’s settings page, including adding or removing members, approving membership requests, and setting thresholds for automatic spending approval. Requests that require financial approval are accessible via View Requests from the navigation panel. The links below redirect to the iLab Help Site on these related topics:
- Access your lab or group
- Layout of members tab
- Set approval thresholds
- Manage lab or group members
- Accept/decline membership requests
- Approving requests
- Reviewing invoices
If the projected cost of a request exceeds the auto-approval threshold set for group members, the request will require approval by either the PI or department managers before it may begin. An email notification will be delivered from no-reply@ilabsolutions.com with the request details and a link to direct to the core page to apply approval. You may also view all requests submitted by your group members and apply approvals. The links below redirect to the iLab Help Site on these related topics:
Invoices are accessible from the navigation panel (see related section Overall navigation), and a direct link is emailed to the PI and whomever is listed as a financial manager within the group whenever an invoice is generated. It is important to review the charges on an invoice to ensure it is accurate. Once created, an invoice may be edited or disputed within three business days before it officially posts to the ASU Financial System. An invoice summarizes charges per service request, per researcher.
Modifying the charge account
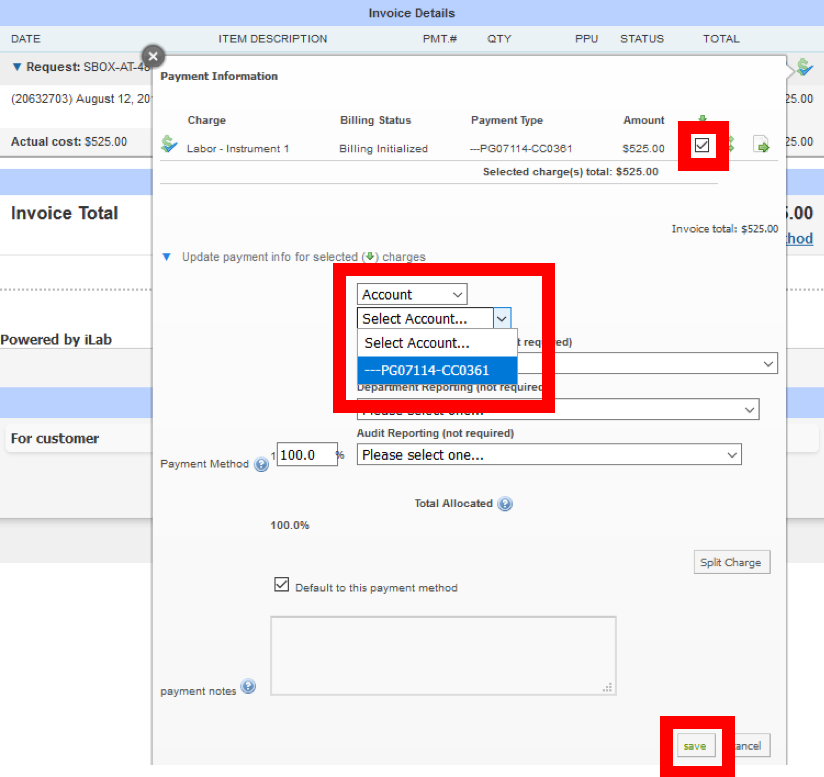
The charge account listed for each service item on an invoice may be changed within three business days before it officially posts to the ASU Financial System. To do so, click on the dollar symbol to open a charge summary for the request, check the box for each service item requiring modification, select the new account from the dropdown menu, then click to save.
Note: The researcher/owner of the service items must have permission to spend on the new account prior to updating the invoice. See Grant & Other Account Management for further instructions.
Tip: Refresh the browser window to verify the new account has been successfully assigned as intended.

Disputing charges
Hovering your mouse over a line item’s total cost reveals a yellow flag which allows you to dispute a charge if clicked. Note: This feature is only available within three business days after an invoice is created. After that period, the invoice is locked and processed within the ASU Financial System.
To dispute a charge on an invoice, hover your mouse over the charge’s total cost to reveal the yellow flag. Clicking on this flag opens a window, prompting you to select a reason for the dispute and to provide a note. Include a detailed description of the issue, then click “Initiate dispute.” Your message will be delivered to the Core Facilities Financial Office, who will work with the lab managers to verify your claim and apply any necessary changes.


Reports are accessible from the navigation panel and allow you to run reports on all billed and unbilled data in iLab for which you have manger or PI access. The links below redirect to the iLab Help Site on these related topics:
Once an invoice is generated in iLab, a countdown of three business days starts. During this time its charges may be modified to post to a different account or disputed. The invoice locks for additional editing after this period and posts as an Internal Service Delivery to the accounts listed through ASU’s Financial System, Workday.
The number of journal lines for a single invoice may vary depending on revenue/expense account combinations, as well as variations in optional worktags. When viewed from the Workday report Detailed Revenue Expense and Ledger Accounts, an invoice’s journal lines display as the following (by report header):
- Business Document: Internal Service Delivery Document ID, displayed as a hyperlink that redirects to the entire ISD (Note that viewing the ISD displays all charges processed by the facility, not just the transactions associated with the invoice)
- Memo: Name of the Core Facility that rendered services
- Line Memo: URL to view the entire invoice online (copy/paste the URL into a new browser tab for viewing)
- Actuals: The journal line subtotal for an invoice

How do I view invoices for a PI/Group?
- On the navigation panel, click on the Invoices link to view all invoices related to your department. You can use the filters to find invoices for a specific account, PI / Group, core facility, etc. If you do not see a PI / Group in the list of available invoices, then make sure the PI / Group is affiliated with your department.
See related topics: Overall navigation, Department management
I am a manager within a department, but I want to be notified when there is a new invoice for a group. What do I do?
- Being a manager at the department level gives you the ability to retrieve invoices for all groups affiliated with your department and manage the groups, including researcher memberships and account permissions. However, it does not place you on the email distribution list when invoices are delivered. To ensure you are on the email distribution for invoices for a PI / Group, follow these steps:
- Click My Departments, found on the navigation panel, and click on the group name when it appears
- Click the “link existing user” icon below the list of members.
- Type your name; when it appears click it
- Indicate your role as “manager”, then click “invite” (skip the start/end dates)
- When your name appears in the list, click the pencil icon.
- Check the box to indicate you are the core financial contact then save.
See related topics: Overall navigation, Manage lab or group members
How do I set up researcher(s) to obtain services and pay with an account(s)?
- You may link a researcher to a group and assign them permission to spend on an account(s) by following these steps (if the researcher is already in the group, follow steps 1, 5, and 6):
- Click My Departments, found on the navigation panel, and click on the group name when it appears.
- On the Members tab, click the “link existing user” icon below the list of current members and type the researcher’s name (last name preferred).
- When the researcher’s name appears, click on it
- Indicate their level of membership in the group (Member is standard), then click “invite”. The start/end dates are not required. The researcher will now appear in your list of current members.
- Go to the Membership Requests & Accounts tab and refresh your web browser
- Check the box(es) by the researcher’s name that appears under the account(s) on which you wish to give them spending permission; the box(es) will highlight green signifying the changes have been saved.
See related topics: Research group member management and Grant and other account management
I tried adding a new member to a group, but nothing happened. What do I do?
- If you tried searching for a researcher’s name but they did not appear as a search result, either their name in iLab does not match what you entered, or they have not yet registered for an iLab account. Have the researcher request membership into the group.
- If you found the researcher’s name and tried to invite them but nothing happens, check to see if they were once a member of your group but their membership expired. A link “Show Expired Memberships” is visible on the top-right of the list of current members on the Members tab. Click on it, and expired members will appear highlighted pink. If the researcher’s name is in the list, click the pencil icon to modify their membership start/end dates.
See related topics Overall navigation and Research group ember management
I tried removing a member from a group, but a popup window appeared telling me they have unpaid charges. What do I do?
- Check the dates and facilities listed in this popup window. If the dates are newer than six months, check to confirm with the facilities whether the researcher has unbilled charges. If so, then you may remove the researcher from your group after the charges are billed and post to the ASU Financial System.
- If the dates are older than six months and the facilities confirm there are no unbilled charges for that researcher, then modify the researcher’s membership end date to yesterday’s date by clicking on the pencil icon by their name.
See related topic Manage lab or group members
A grant does not appear in a group. What do I do?
- A grant may not be visible in a group for these reasons:
- The PI of the group is not listed as the Lead PI on the grant in ASU’s Financial System. Anyone needing to request services or make reservations on the grant should request membership into the Lab or group of the Lead PI. If the PI is supposed to be listed as the Lead PI, contact the Grant Contract Officer to update the ASU Financial System and the grant will appear in the iLab group the day after the change is effective.
- The grant is expired or not yet active according to ASU’s Financial System. Contact the Grant Contract Officer to update the ASU Financial System and the grant will appear in the iLab group the day after the change is effective.
I received an invoice, and I want it paid with a different account. What do I do?
- If you wish to charge a different account than the one listed, you can modify the account so long as the invoice was generated within 3 business days and has not posted to the ASU Financial System. Here are the steps:
- Click on the dollar symbol icon for the request whose charges need a new account. A summary window will appear.
- Check the box(es) for each charge you wish to update.
- Select the new account from the dropdown menu. Note: The researcher who is listed as the owner of the request must first have permission to spend on the new account. See below links for further instructions if necessary.
- Click the save icon to set your changes. Tip: Refresh your web browser to see an updated version of the invoice to ensure the changes were made as intended.
See related topics: Overall navigation, Grant and other account management, Reviewing invoices
I received an invoice and although the correct account is listed, there is an error with a charge. What do I do?
- If a charge on an invoice seems incorrect, dispute the charge directly on the invoice ASAP. You only have three business days to make any changes to the charge before it is processed in ASU’s Financial System. Here are the steps:
- Open the invoice in iLab via the link provided at the bottom of the notification email or find it on the Invoices page in iLab.
- For each charge in dispute, hover your mouse over the total cost to reveal a yellow flag, then click on it.
- After clicking this flag, a popup window will appear. Select the reason for your dispute and provide a detailed description in the dispute notes section. Click the Initiate Dispute icon.
- Your dispute(s) will be delivered to the facility’s finance office for review. They will follow up with the lab managers to verify how the charge should be modified and make any applicable changes directly on the invoice.
See related topics: Overall navigation and Reviewing invoices
A grant is going to expire. What does this mean?
- You must ensure any reservations or service requests occur prior to the account’s expiration date (aka the period of performance). Many core facilities generate invoices after the service month has closed, meaning the account may not be charged until after the account has expired, which is not problematic. The billing workflow is not tied to this expiration date and has a longer administrative window to close out any final expenses, so long as they occurred during the period of performance.
I am not finding the answer I need on this website. What do I do next?
- If your issue is related to one of the following:
Core Facility Services: Contact the core facility. A list of the facilities and their primary contacts is visible on iLab’s list of Available Cores.
Invoices and accounts: Send an email to corefacilitiesfinance@asu.edu.
System Glitches and All Other Issues: Contact Support.


